
Lagging The Robot Module
Propper lagging of the robot module is incredibly important. Failure to properly install the robot can result in an unstable and potentially dangerous palletizer.
Specifications:
Minimum Concrete Thickness: 7in
Minimum Concrete Temperature: -10° C (14° F)
Cross Section:
|
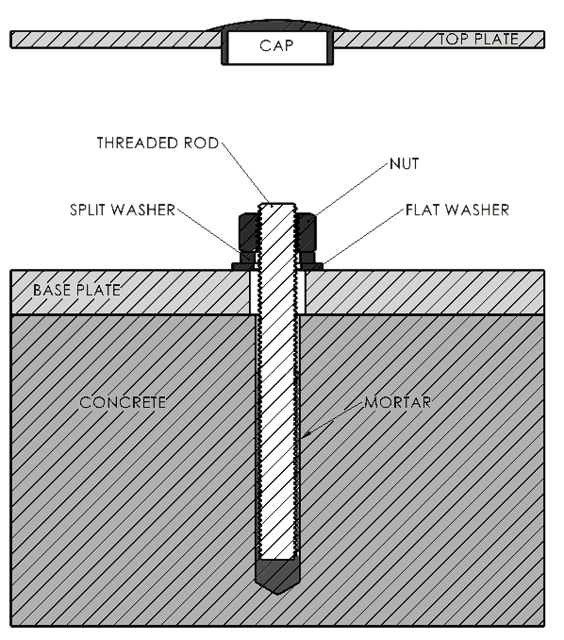
CARBON and Permanent CUBE Installation
|
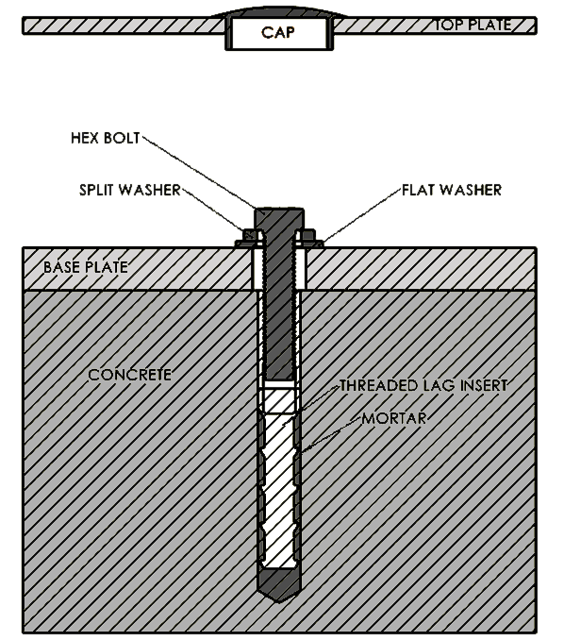
CUBE Temporary Installation
|
Required Tools:
- SDS-Max Rotary Hammer
- 24" Long Vacuum Extraction Bit
- Carbon/Temporary Cube: 1" DIA
- Permanent Cube: 7/8" DIA
- Tape (for marking depth)
- Shop Vac
- Hilti Epoxy Dispenser
- Deep Socket with 1/2 drive
- Carbon:
- Permanent Cube:
- Temporary Cube:
- 1/2 drive Torque Wrench
Materials Required:
|
Permanent Cube:
|
Temporary Cube:
|
Carbon:
|
Instructions:
1. Mark Drill Depth
2. Drill Concrete
3. Clean Holes
4. Prep Fasteners
5. Inject Epoxy Mortar and Press Fasteners into Holes
Depending on the temperature of the concrete, working times can be quick. Be sure to plan accordingly to make sure the fasteners are installed within the working time of the mortar
| Temp °C (°F) | -10...-5 (14...23) | -4...0 (24...32) | 1...5 (33...41) | 6...10 (42...50) | 11...20 (51...68) | 21...30 (69...86) | 31...40 (87...104) |
| Working Time | 1.5 h | 50 min | 25 min | 15 min | 7 min | 4 min | 3 min |
| Cure Time | 7 h | 4 h | 2 h | 1.25 h | 45 min | 30 min | 30 min |
Working and Curing Times
6. Wait for Cure Time
See above table for curing times.
7. Torque Fasteners
Torque:
Cube: 100 lb-ft
Carbon: 125 lb-ft
8. Install Top Plate Caps